|
DirectX is an API that will act as a bridge for communication between the supporting hardware/ software and games. In simple terms, you can make the gameplay smooth and also render the associated things like audio and video in good quality.
On your Windows operating system, there is no specific dedicated setting available to enable DirectX 12. If you are using the older Windows 7 operating system, then start by updating the GPU driver installed on the computer. If you don’t have any clue about the steps to know how to turn on DirectX 12, then check out the guide carefully. Steps to Enable DirectX 12 in Windows 7 If you are using Windows 7 operating, then it is advisable to update the graphic driver on the computer. To do that, you need to go to the official website of the graphic driver manufacturer. Let’s check out the steps to perform if DirectX 12 support not detected issue:
Methods to Enable DirectX 12 in Windows 10 Let’s check out the steps to enable DirectX 12 in Windows 10:
Although the DirectX runtime web installer is available then, you can reinstall it. So, to enable DirectX 12 on Windows 10, it is advisable to follow the guidelines properly. How to Enable DirectX 12 for Fortnite?
How to Enable DirectX 12 for Battlefront 2?
Is DirectX 12 and DirectX 12 Ultimate the Same? While talking about DirectX 12 ultimate then, it is the newest version of DirectX, and it is considered to have the gold standard for new-age gaming. It is quite different from DirectX. Along with it, DirectX 12 comes with the new API version, and it also supports ray tracing and mesh shaders. You will get through the advanced graphic settings for DirectX 12 options to turn on DirectX12 in other games.
0 Comments
Lots of computer users are dealing with the issue where when users plug into Windows 10 computer then, it will show that the device is plugged in; however, users deal with it not charging.
If users deal with the issue, then you don’t need to worry because you are not the only one dealing with the issue on the computer. One of the common issues is the laptop not charging non-removable battery. Methods to Resolve Laptop Not Charing Non-Removable Battery Here’s the list of common fixes that users need to try to troubleshoot the error. Update Battery Drivers Most often, users face issues with Windows computers, and the problem lies in wrong or un-updated drivers. So, when you are facing the issue, then try to update the battery driver and check if it is working or not. Let’s check out the steps to update the battery drivers:
Run Power Troubleshooter For such issues, Windows operating system has added a troubleshooter which will resolve any issue in Windows computers. To use troubleshooter, check out the steps mentioned below:
It will automatically diagnose the issue, and hopefully, users can resolve the issue. Power Reset Resetting the computer will help with the battery not charging issue, so check out the steps below to properly reset the computer:
Update BIOS BIOS stands for Basic Input Output System. It is software that will store on a small memory chip in the motherboard of the computer. BIOS will identify and resolve the hardware issue in the computer or laptop. If something doesn’t work with BIOS firmware settings, then try to update BIOS. To update BIOS, proceed to the Lenovo support page and let your computer detect it. Proceed to the product page and go to Driver and software > BIOS and follow the on-screen wizard to update BIOS on the laptop. Summing Up These troubleshooting methods are effective in dealing with plugged-in, not charging Asus non-removable battery issue. It is advisable to follow the steps properly to not encounter any issues. You may have noticed green lines on your screen if your computer runs Windows 10 OS. These lines are temporary and easy to solve. This is not a hardware issue. It is the old driver for your GPU that is not properly installed and running. This issue can be resolved by updating or installing the driver. There are also some straightforward methods available. Here is a blog about fixing green lines on screen Windows 10. In this blog, we will walk you through the steps needed to troubleshoot and quickly solve the horizontal green line on your Windows 10 laptop.
Solutions to Resolve Green Lines on Windows 10 If you have a system that loses its view and green lines appear on the screen, this can be caused by a bad display cable, an error in the graphics card, or faulty video cables. The solution to the problem may be unknown, but it can be solved on your own by following the below methods. 1. Update Graphics Card Driver The graphics card drivers can be manually updated from the device manager, but you can use DriverFix for a simpler experience. Follow these simple steps to update your graphics card drivers:
2. Update BIOS The other solution to solve the green lines on Windows 10 is to update the BIOS. Follow the below actions to do so:
3. Backspace of the screen driver
4. Reinstall the Monitor Driver
You may notice these green lines appearing on your screen due to a number of issues, such as outdated video card drivers, broken ribbon cables, and incorrect video cable connections. But by following the steps outlined in this guide, you will be able to resolve the problem quickly. As a part of Windows Hello security, Windows PCs now have fingerprint sensors for added security as well as to sign in without entering a PIN. Though Windows fingerprint sensors may be a valuable add-on to your PC, you may experience issues with them. The fingerprint sensors on some Windows PCs are not as strong as those on mobile devices, and they may not work 100% of the time. Some users have reported that the fingerprint sensor on Windows 11 does not work many times, or it unlocks with one finger. It is important to know how to fix Fingerprint Sensor not working in Windows 11. So read this blog and the solutions to solve this issue.
Steps to Troubleshoot Fingerprint Sensor Not Working in Windows 11 A number of related fingerprint problems are reported after installing Windows updates, so here are some solutions to solve fingerprint sensors problems. Manually Install Updates Since Windows 11 fingerprint sign-in isn't working, you will have to revert to your password or PIN in order to log in and manually check for updates.
Turn Off Fast Startup If none of the ways above work for you, try this method for turning off the fast startup. Follow the instructions and check if it resolves the issue with the fingerprint sensor not working in Windows 11.
Remove And Add Fingerprint If you are still dealing with the same issue, try removing the fingerprint from your computer and then add it again. Follow the below steps to remove and add the fingerprint. Follow the steps given below-
Using the steps below can help you to solve the fingerprint sensor not working in Windows 11. Read each step carefully before applying. Try every method until you find a solution that works for you. The above practical steps will help you to troubleshoot the fingerprint sensor not working in Windows 11. With the advent of technology and digitization, it is much easier to do whatever we want without worry. For Windows users, Game Bar DVR is well-known recording software. Users can record the screen and take snapshots through Game Bar DVR. However, through Game Bar, you can only record gaming, not desktop or File Explorer windows. And now, Microsoft has launched Windows 11, and a highly rated recording service is necessary. OBS studio is one of the best open-source recording software options for Windows. It stands for Open Broadcaster Software studio. Although Windows 11 comes with a built-in recording feature, you can use OBS to record videos in high quality. It is also worth noting that the Windows 11 built-in recorder offers limited configuration options. This is why users often search for an alternative. And what better than OBS Studio? You can get the OBS Studio for Windows 11 from its website. So, today we will look at how to install OBS studio Windows 11 machine.
Steps to Download and Install OBS Studio for Windows 11 The only reason people prefer OBS Studio when it comes to screen recording is the multitude of advanced features. With this software, users can easily set up multiple scenes and switch between them with custom transitions. Moreover, this software provides a high-level production view with the ability to switch between multiple views simultaneously. Its unique features make it the most recommended one to download and use. You will need to download and install OBS Studio for PC to use this software. To install OBS Studio on Windows 11, you can follow the instructions below.
For your convenience, we have split this post into two sections, including how to download and install OBS Studio. So, what are you waiting for? Get this tool for recording and live streaming right now. In terms of security, Windows 10 is the most secure Windows iteration so far. However, the security functions have no logic whatsoever. And even when there isn't any logic, Microsoft fails to explain why things happen as they do. Consider the "Windows security sign-in pop-up," which blocks Wi-Fi connections and requests that you sign in. Every time you attempt to connect to Wi-Fi. This forces you to use LAN. Moreover, this is usually the password protection that is untouched by users. Some might attribute this to Outlook, but it doesn't appear to be the case every time. Fortunately, there is a way to fix the problem. Here is how to get rid of windows security pop up. So, confirm to check them out below.
Steps to Get Rid of Windows 10 Security Popup In order to disable the Windows security pop-up from your Windows 10 OS, you can use any of the following methods. First, close all open tabs and browser windows on your system. Now, follow the below methods: Method1: Turn Off Password Protected Sharing Option There are many reasons why this unpleasant popup will appear. This is most commonly caused by HomeGroup sharing. If your multiple PCs are connected via HomeGroup sharing, you should disable the password protection option. Here are the steps to disable the password-protected sharing feature on Windows 10:
Method 2: Reset the Browser Settings You can also resolve such issues by resetting your browser to its default setting if you see any Windows Security pop-up windows. This also helps remove any unwanted changes that have been made while installing other programs. To reset the browser settings, follow the below steps:
Method 3: Check Credential Manager You should also try deleting some inputs from the Credential Manager since incorrect credentials can also trigger Windows 10 Security pop-up issue. To delete them, follow these steps:
Method 4: Reset Network settings Lastly, resetting your network settings may help you resolve pop-up credential problems. The Windows security pop-ups may appear due to minor Wi-Fi network issues. In this case, resetting the network settings will resolve credential pop-up problems. Follow the below steps to reset network settings in Windows 10:
There are many ways to disable the Windows 10 security pop-up that won't disappear. Windows 10 is a great operating system. Once you've completed the steps in this post, restart your computer and check if the changes have taken place. Blue Screen of Death (BSOD) errors appear when a file cannot be loaded. The BSOD error indicates a fatal error with a 0x124 bug check value. The BSOD error can be confusing for Windows users, but they serve a specific purpose. If the PC is restarted immediately after a critical error occurs, then it will generally be able to recover since this prevents the damage from being done to the system. If pshed.dll BSOD errors occur regularly, they may be an indication that the system's hardware is failing. Users who encounter this error are not given much information about it, despite its existence in the registry. This blog will explain how to fix Pshed.dll Windows 10 BSOD errors with the most effective methods.
Steps To Solve Pshed.dll BSOD Errors in Windows 10 There are specific BSOD errors referred to a dynamic link library system file named Pshed.dll. The dump files of the BSOD errors indicate that driver Pshed.dll is to blame. These are methods you can try to solve BSOD errors caused by Pshed.dll. Run A Windows 10 Repair Utility Scan Some third-party BSOD fix utilities are capable of fixing an array of BSOD problems. These programs include options to scan for hardware, security, and stability errors. Restoro's updated functionality allows it to replace those components even after scanning the system. Thus, this BSOD issue can be resolved with just one click. It can also help you create a restore point before beginning the repairs, allowing you to restore your system to an earlier version if something goes wrong. The following steps will guide you through the Pshed.dll Windows 10 BSOD fix:
Update System Drivers It is also possible to upgrade the system drivers and resolve the pshed.dll error. If you follow the instructions below, you will be fine.
Run A SFC Scan Follow the actions below if you encounter the Blue screen pshed.dll error and need help resolving it. Don't forget to run an SFC scan if you encounter the Bluescreen pshed.dll error.
Update The PC's BIOS & Stop Overclocking You can try stopping overclocking if that doesn't work. If it still doesn't work, the pshed.dll BSOD error may have been caused by an outdated BIOS. This component controls the operation of the computer.
If you follow the instructions carefully, most of your pshed.dll errors should be resolved. Try each method one at a time until you resolve your errors. Hopefully, you found this blog useful in solving your error.  In Facebook, the page owner or user can create their own unique URL for their business page or brand page. While this process is simple and straightforward, sometimes the user may receive an error message that reads, "This page isn't eligible to have a username." It is most likely that you will either see a message that says: 'Username not available' or 'this page cannot have a username.' Several reasons could be causing this error (this page is not eligible for a username), including that your Facebook page does not have 25 likes or that you do not have administrative privileges. The problem might be caused by a driver power state failure on Windows 10 or another error related to the verification process for your web page. Below are some solutions to this issue.
Steps to Solve “This Page isn’t Eligible to have a Username” Error To solve this error message saying that a username cannot be assigned to this page, you can try these troubleshooting methods with their detailed steps. 1. Assign a New Page Role
2. Use an Alternate Facebook Account If you receive the "Facebook this page isn t eligible to have a username" error message, the easiest method to solve this is to make a friend an administrator of the page and then create your own custom URL. This is how you do it.
It is possible to resolve the error using the method we mentioned in this post, but the reason for Facebook This Page not being eligible for a name is still unknown. If this happens again, you might consider preparing a backup account. Using Windows 10, users can create two user accounts: an Administrator account or a Standard Account. Administrator accounts and Standard Accounts have different privileges users can use when accessing devices and apps on their system. Having Administrator rights gives you access to your system, such as changing settings globally, installing apps, and more. If you want to have Administrator privileges in Windows 10, you can take a couple of steps. Your Windows 10 system will create a Standard User account by default. However, you can take administrative rights to access all the controls not available to a Standard User account. Here is how to make yourself an admin on Windows 10 by four different methods.
Methods to Make Yourself an Administrator on Windows 10 In Windows 10, there are generally four different methods to become an Administrator. Follow the steps for each method. Use Windows Settings Utility The following steps will allow you to make your existing Standard User account into an Administrator account in Windows 10's settings utility. To become an Administrator on Windows 10 systems, follow the below steps.
Use the Control Panel It is also possible to change your account type in the Control Panel of your Windows 10 operating system.
From the User Accounts Utility Using Windows 10's user account utility option is the third method to use. Follow these instructions to do so:
Use Command Prompt The last method for Windows 10 how to make yourself administrator is to use cmd. You will need to use a command prompt to turn a Standard User account into an Administrator account on a Windows 10 system, so you will need to execute some commands.
Now, you know how to change your User account into an Administrator account and access all the privileges. Follow and apply the above four stepwise methods in your Windows 10 OS. 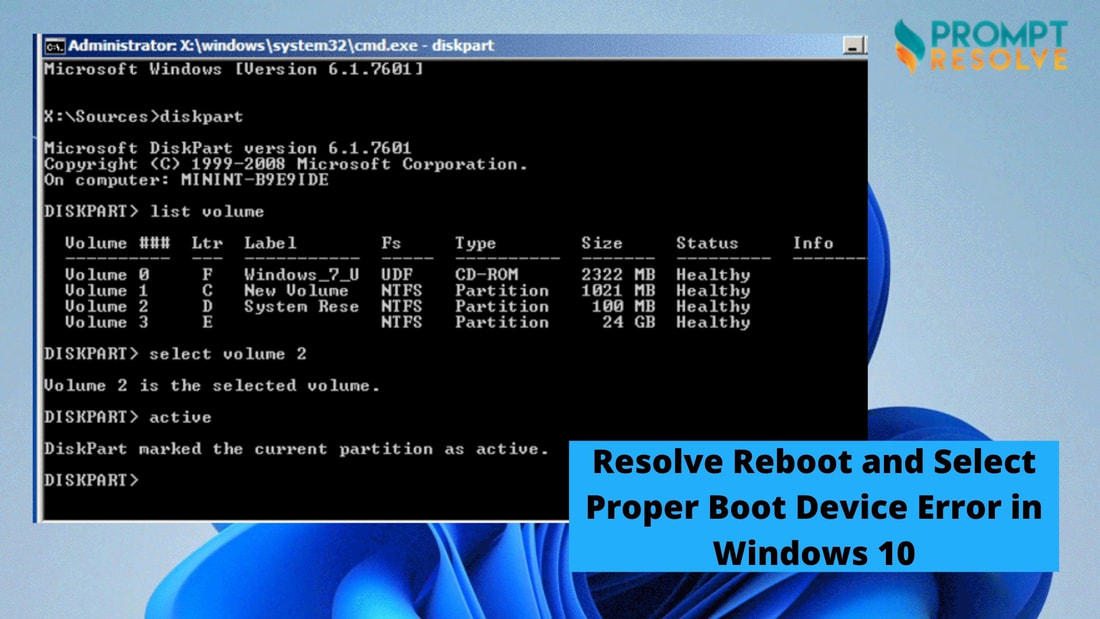 While starting up your computer, you may be greeted with an error screen that prevents you from starting your operating system or doing anything for that matter. The "reboot and select proper boot device" error message indicates that your system's basic input/output system (BIOS) is unable to find your operating system's boot device. UEFI requires that you restart the computer, enter he BIOS and choose the correct boot device with the operating system for the computer to boot from, depending on the cause of the error message. Hardware, as well as software issues, can lead to this error message. So, let's look at the various solutions to know how to fix "Reboot and Select Proper Boot Device" error message. Solutions to Resolve "Reboot and Select Proper Boot Device" Error Message By taking the corresponding measure outlined below, you will save a lot of time if you know the exact reason this error occurred. Follow the following steps. Check the Boot Sequence Checking your PC's boot sequence will be one of the most effective ways to resolve the problem. Here's how you can do so:
Examine the Power Cable Connecting your Hard Drive Disk The power cable will not be detected by the computer when it is damaged, frayed, or disconnected. If your hard drive cannot be detected by the computer, likely, the hard drive is not working. Follow these steps to check the power cable.
Set BIOS to Best Defaults The problem may be, even though this solution is a long shot, that your BIOS is not set to its defaults, which can sometimes cause instability, and that instability may be what causes the error message "reboot and select proper boot device." The process is as simple as rebooting your PC and launching the BIOS, and selecting "load optimal defaults." Once it is loaded, restart the PC. Run Diskpart The select proper boot device error may appear if your main partition isn't set as active. To resolve this issue, you'll need to use diskpart to revert your partition to active status. You must have your original Windows installation media to perform this action. Below are the steps you need to follow:
Using the above solutions may resolve the issue. If this doesn't work, check your SATA drivers using Safe Mode. If the problem persists, replace your motherboard's CMOS battery, which may contain errors. You might also need to reinstall Windows if you suspect that your operating system is corrupted or that the boot drive is damaged, corrupted, or dead. |
AuthorWrite something about yourself. No need to be fancy, just an overview. Archives
December 2022
Categories |
 RSS Feed
